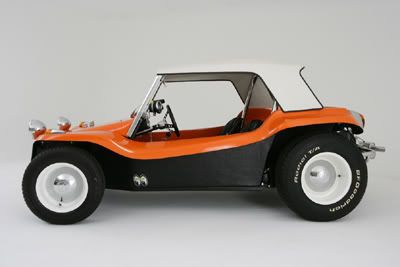
Manx Buggy build thread!

OK, more updates.

If you go back a few posts, you will see that i cut out the old seat adjusters out of the buggy pan, as they didnt work with the seat frames from the VW. It was a ROYAL pain in the butt. So when i cut the ones out of the bug, i just cut the whole thing out of the pan, floor and all. :grin: Ahhhh, much easier.

IMG_1068.jpg


Placing the chunks on the pan. Im just going to weld them in as is. The pan will be double thick under the seats, no big deal.

IMG_1069.jpg


IMG_1070.jpg


Set a seat over on the driver's side, just to see how it will look.

IMG_1071.jpg


Put in the master cylinder, and loosely hooked in all the brake lines.

IMG_1072.jpg


And put the speedometer cable in place. The end in my hand connects to the speedometer, the end i am vaguely pointing to in the second pic just goes through the center of the spindle. The driver's side front wheel is where VW connects all their speedometers.

IMG_1073.jpg


IMG_1074.jpg


So thats it for today. Moving right along! I picked up some special grease for the rear Constant Velocity joints, i'll be repacking those and installing them soon.
 
By the way, i found this place . . .

http://customcommercialwheel.com/

I'm going to pack up 4 wheels and send them up to them. They are going to take 2 of them and cut out the centers and weld in 7 inch wide rims for the back, and i'm leaving the fronts stock width for a bit of a big n little look. Then they are going to sandblast all 4 and powdercoat them white, and i'll get new shiney VW hubcaps for them. I'm going for the old school beach buggy look. It will look something like this . . .

wren2.jpg
 
They are wonderfully simple, although not having a body on it does tend to facilitate things a bit. :embarrassed:
 
Nothing much to report today. Worked on hooking up the pedal assembly to the clutch, gas, and brake stuff and struggled and got pissed off. :mad: The clutch cable attaches to a hook on the pedal, then gets inserted into the tunnel. Then during the hooking up of other stuff the pedal flopped over and came unhooked, so i have to take it all apart again and start over. Tomorrow i'll bring some zip ties with me and tie it to the hook to try and keep it from coming off. blah.

Took a break, i'll fiddle with it tomorrow.
 
OK. Whew. Its always good when you start getting mad to just step back and take a breath.

I took another run at the pedal assembly again today, and got it all hooked up.

IMG_1077.jpg


If you can see where the pedal assembly bolts to the tunnel, that was what was giving me the headache yesterday. You have to sorta gingerly hook it up and try to tuck it all back inside the tunnel, then get brakes and all hooked up without it falling off. This time i took a bunch of zip ties and used them to hold it in place. Yay!

IMG_1078.jpg


Ran the rear brake line back to the back. Since the buggy is shorter, there is extra tubing. Since i dont have all the appropriate stuff to shorten it, i went ghetto and just made a loop. :embarrassed: I just want to get this thing done and on the road.

IMG_1079.jpg


So thats it for now. I think this weekend i'm going to stay home and start trying to sort out the wiring harness. Probably just spread it out on the living room floor and try to identify and tag everything.
 
I'm going to try to sort this out this weekend. I started looking it over, it wont be easy. some wires popped off before i could label them. Should be fun. :facepalm:

IMG_1082.jpg
 
Good luck.

This weekend, I looked at a schematic of the amp kit I've ordered, and labelled all the stuff on the physical layout. PITA. :embarrassed:
 
I got it all done. stretched it out on the living room floor, crawled around with masking tape and a sharpie and a schematic and figured it all out and labeled it. whew. It wasn't fun, but once the body is painted and on, it will make life easier.

I ran into one hang up, there was an extra toggle switch under the dashboard, and a relay that had been under the back seat. a small signal wire went to the speedo. It wasnt on the schematic, and i was absolutely baffled.

Fortunately, i figured out it was for the rear window defroster, which was an option. There was a warning light for it in the speedo. :embarrassed:

So i cut that part out, plus lots of stuff like door switches, dome light, stuff i wont need.
 
You should keep the dome light. Just for shits and giggles. Maybe mount it on the dashboard or something :embarrassed:
 
Yeah, i figure i'll wire in some kind of interior light. Maybe up behind the passengers on the roll bar pointing down. I probably wont use the stock beetle one though. I also want to run a wire for a mount for a lighted buggy whip, and i have a pair of off road lights im going to mount in the front bumper somehow, i havent quite figured out the whole front bumper/lights/license plate thing yet.
 
OK, i made another pretty decent step today, although not super interesting. I got the clutch cable shortened and hooked up so the pedal works just fine.

So now i have brakes, and clutch. Next is the gas pedal. One night this week i have some welding to take care of, the seat mounts, and the gas tank filler.

After that, im going to paint the pan with bedliner material. Its tough, thick, easy to clean, and will protect against rust. :thu:

I also am getting the 4 wheels ready to send off to the place for widening and powder coating. It's getting closer!
 
OK, wheels are sent off, and i made an appointment for next Saturday the 10th for a guy to paint it in a paint booth here in town.


OMG ITS GETTING CLOSER!
 
Yeah, i really want to get it off the guys' property. I need to wrap this up fast. hahaha.
 
Last edited:
OK, a couple more small updates, mostly just so i can have some more pics for folks to look at. :embarrassed:

First, the stock beetle gas filler is over on the side, but the hole for the buggy filler is in the middle of the hood. So i cut the filler out of an old tank and need to weld it in the new one, i had to mark where it goes.

Gas tank in place

IMG_1096.jpg


Put the nose piece on.

IMG_1093.jpg


lined up the filler and marked where its going to go.

IMG_1094.jpg


Once the tank is in place, it will be accessed through this cap.

IMG_1095.jpg


Also have to get ready to cut the holes for the taillights, before it gets painted. I made a template of cardboard.

IMG_1097.jpg


Measured and marked where its going to go.

IMG_1098.jpg


Should look something like this.

IMG_1099.jpg


Thats about all i did today. More to come.
 
Back
Top