_pete_
HCEG refugee
Recessed Floyd install on my new PRS
Ok boys & girls, today is the day.
The brand spankin’ new PRS SE Singlecut has been attacked by a crazy bastard with a router.
I took lots of pics so I will have to make a few posts to get them all in.
The Floyd Rose Special I got for it is a thing of beauty. I got the satin chrome finish and it is beautiful. It matches nicely with the pup covers I buffed with a Scotchbrite pad.
Tools for the job are a Porter Cable router with a 5/16” template collar, a ½” shank ¼” bit, a drill press, masking tape, tape measure, straightedge, various drill bits, and Stew Mac’s Floyd Rose templates.
Here’s the router bit I used.

After stripping everything off the guitar, cover the face of it with tape and mark the centerline. It was nice that the bookmatched flame top has a nice line running down the center.
There are 2 templates used. The first locates the points where the bridge posts will be and opens up the rout for the trem block slightly. The other does the recess.
According to Stew Mac, the centerline for the bridge posts is 24.5” from the fingerboard edge of the nut on a 25” scale guitar. I marked that point and attached the first template.
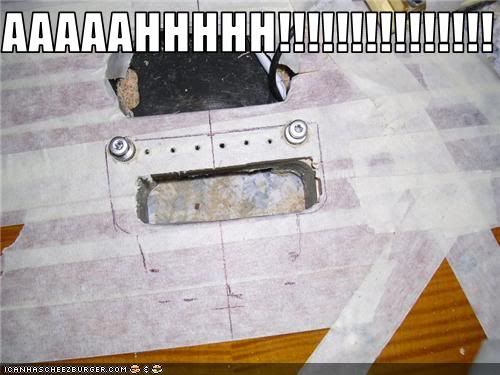
After the routing is done, drill the post holes for the bridge. These used a ½” bit and it’s best done on a drill press. These need to be square and straight. The bushings need to fit tightly. Any slop or movement and the guitar will never stay in tune.
Here’s some pics:


(continued in next post)
")
Next, put the studs in and hold the bridge in place. Trace around it to see exactly where the recess needs to be. Attach the 2nd template and rout to the needed depth. I routed 1/8” deep in two passes 1/16” at a time. Using the smaller opening of the template, rout the fine tuner end of the recess. I routed this part ¼” deep so there would be plenty of room for pulling up.


(continued in next post)
Having the top taped off makes it easy to paint the newly routed recess. I used flat black and then a coat of clear gloss.


A perfect fit!!!

Next up is the nut. The headstock angle and narrow space for the nut makes this a little harder. After removing the stock nut, I checked the depth with the Floyd nut and found that I didn’t have to take any wood off. In fact the Floyd nut needed to be shimmed up.
To keep the nut level and solid I put 2 very small screws into the angled part of the headstock behind the nut. The screw heads keep the nut level. I also had to cut a thin shim to raise the nut to the proper height. This nut can either be screwed on from the top or with bolts through the neck. I went the top mount route.
Before attaching the nut, I wanted to redo the headstock to look more like a USA PRS. I sanded it with 400 grit paper on a flat sanding block and gave it a couple coats of flat black.
I gave it a light coat of satin lacquer and after that dried, I put the new PRS logo decal on it. After that it got 3 or 4 coats of satin lacquer.


(continued in next post)
I really got lucky with this one. I’ve done a bunch of Floyd installs but this one came out so good. I barely had any setup work to do at all. Action & intonation were nearly perfect. I don’t hear much difference in tone at all. It sounds really good.
The big test was staying in tune. I played it for a couple hours and it stayed dead on perfect even with hard abuse.
This turned out to be a great project. It makes me miss my Axcess a lot less.
(Excuse the sawdust on the headstock)


Ok boys & girls, today is the day.
The brand spankin’ new PRS SE Singlecut has been attacked by a crazy bastard with a router.
I took lots of pics so I will have to make a few posts to get them all in.
The Floyd Rose Special I got for it is a thing of beauty. I got the satin chrome finish and it is beautiful. It matches nicely with the pup covers I buffed with a Scotchbrite pad.
Tools for the job are a Porter Cable router with a 5/16” template collar, a ½” shank ¼” bit, a drill press, masking tape, tape measure, straightedge, various drill bits, and Stew Mac’s Floyd Rose templates.
Here’s the router bit I used.
After stripping everything off the guitar, cover the face of it with tape and mark the centerline. It was nice that the bookmatched flame top has a nice line running down the center.
There are 2 templates used. The first locates the points where the bridge posts will be and opens up the rout for the trem block slightly. The other does the recess.
According to Stew Mac, the centerline for the bridge posts is 24.5” from the fingerboard edge of the nut on a 25” scale guitar. I marked that point and attached the first template.
After the routing is done, drill the post holes for the bridge. These used a ½” bit and it’s best done on a drill press. These need to be square and straight. The bushings need to fit tightly. Any slop or movement and the guitar will never stay in tune.
Here’s some pics:
(continued in next post)
Next, put the studs in and hold the bridge in place. Trace around it to see exactly where the recess needs to be. Attach the 2nd template and rout to the needed depth. I routed 1/8” deep in two passes 1/16” at a time. Using the smaller opening of the template, rout the fine tuner end of the recess. I routed this part ¼” deep so there would be plenty of room for pulling up.
(continued in next post)
Having the top taped off makes it easy to paint the newly routed recess. I used flat black and then a coat of clear gloss.
A perfect fit!!!
Next up is the nut. The headstock angle and narrow space for the nut makes this a little harder. After removing the stock nut, I checked the depth with the Floyd nut and found that I didn’t have to take any wood off. In fact the Floyd nut needed to be shimmed up.
To keep the nut level and solid I put 2 very small screws into the angled part of the headstock behind the nut. The screw heads keep the nut level. I also had to cut a thin shim to raise the nut to the proper height. This nut can either be screwed on from the top or with bolts through the neck. I went the top mount route.
Before attaching the nut, I wanted to redo the headstock to look more like a USA PRS. I sanded it with 400 grit paper on a flat sanding block and gave it a couple coats of flat black.
I gave it a light coat of satin lacquer and after that dried, I put the new PRS logo decal on it. After that it got 3 or 4 coats of satin lacquer.
(continued in next post)
I really got lucky with this one. I’ve done a bunch of Floyd installs but this one came out so good. I barely had any setup work to do at all. Action & intonation were nearly perfect. I don’t hear much difference in tone at all. It sounds really good.
The big test was staying in tune. I played it for a couple hours and it stayed dead on perfect even with hard abuse.
This turned out to be a great project. It makes me miss my Axcess a lot less.
(Excuse the sawdust on the headstock)